

After setting up the control plane, web UI, and relay, the last daily workflow is onboarding devices: use the Tailscale client with tailscale up --login-server to log into self-hosted Headscale, then approve and manage devices in headscale-ui.
系列:Tailscale Lab 4 / 4
- 1 What Is Tailscale: A Practical Introduction to P2P Private Networking
- 2 Adding a Web UI to Headscale: headscale-ui Setup Notes
- 3 Self-Hosted DERP Relay: Stable 20ms Domestic Fallback for Headscale
- 4 Joining Devices to Self-Hosted Headscale: From tailscale up to headscale-ui Management 当前
Background: the prologue explained the principles, headscale-ui added a management UI, and self-hosted DERP moved the relay closer. This final post covers the most common daily operation: how a new device logs into self-hosted Headscale with the Tailscale client and is managed in headscale-ui.
Overall Flow
Onboarding a device takes five main steps. Headscale is the control plane, the login points to it, and management happens in the web UI:
flowchart TD
    A["1. Install Tailscale client"] --> B["2. tailscale up
--login-server=self-hosted URL"]
    B --> C["3. Terminal outputs register link
(with nodekey)"]
    C --> D["4. Approve device in headscale-ui
assign to a user"]
    D --> E["5. Device online
gets 100.64.x.x"]
    E --> F["6. Daily management
routes / tags / expiry / delete"]

    style B fill:#ffe9d5,stroke:#b71d18
    style D fill:#ffe9d5,stroke:#b71d18
The two key points are: use --login-server to point to your own Headscale, and approve the device in headscale-ui. Official Tailscale handles this automatically, but self-hosting requires explicit approval, which is part of having control.
1. Install Tailscale Client
Use the official client on each platform:
# Linux
curl -fsSL https://tailscale.com/install.sh | sh

# macOS: install Tailscale from App Store, or brew install tailscale
# Windows: download installer from the official site
2. Log Into Self-Hosted Headscale
Normal Tailscale uses tailscale up to log into the official control plane. For self-hosted Headscale, use --login-server:
tailscale up --login-server=https://vpn.e7coding.com--login-server is the key to the whole self-hosted setup. It tells the client: do not use official Tailscale; authenticate with my Headscale server. The address must exactly match your Headscale server_url, including protocol and port.
After running it, the terminal does not connect immediately. It prints a register link containing this device’s nodekey, waiting for approval:
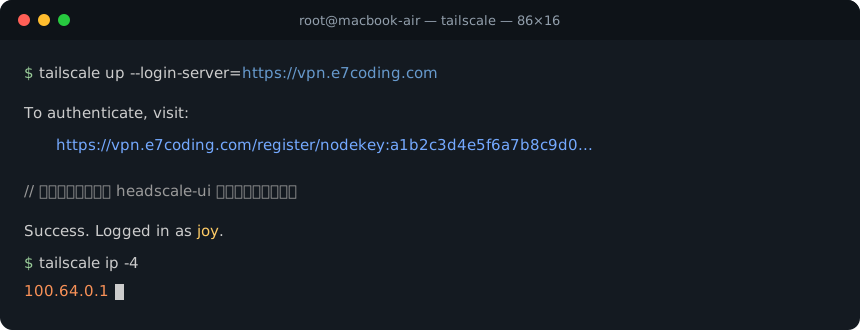
Copy the nodekey:... from the link for the next step.
3. Approve the Device in headscale-ui
There are two ways to register the device.
Option 1: command line on the Headscale server:
headscale nodes register --user joy --key nodekey:a1b2c3d4e5f6...Option 2: headscale-ui, recommended. Open “Register Machine,” paste the nodekey, choose the user, and register:
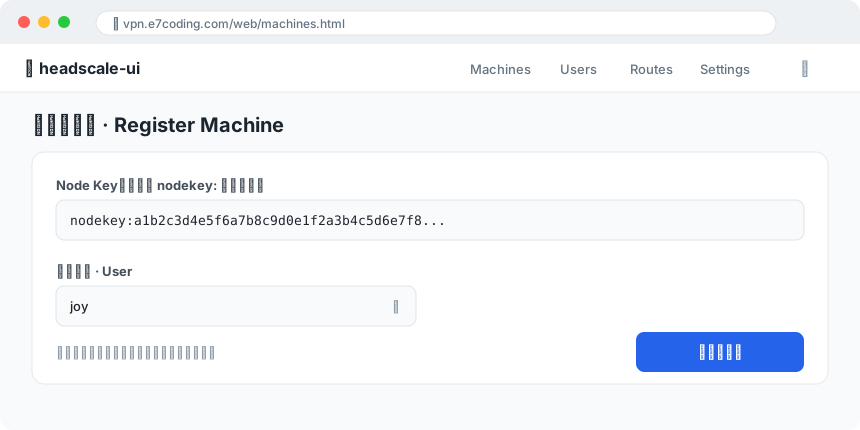
Headscale devices must belong to a user. If you do not have one, create it:
headscale users create joyor create it in the Users page of headscale-ui.
4. Device Online and Device List
After approval, the original tailscale up command succeeds. The device receives a 100.64.x.x Tailscale IP. In headscale-ui’s Devices page, you can see it:
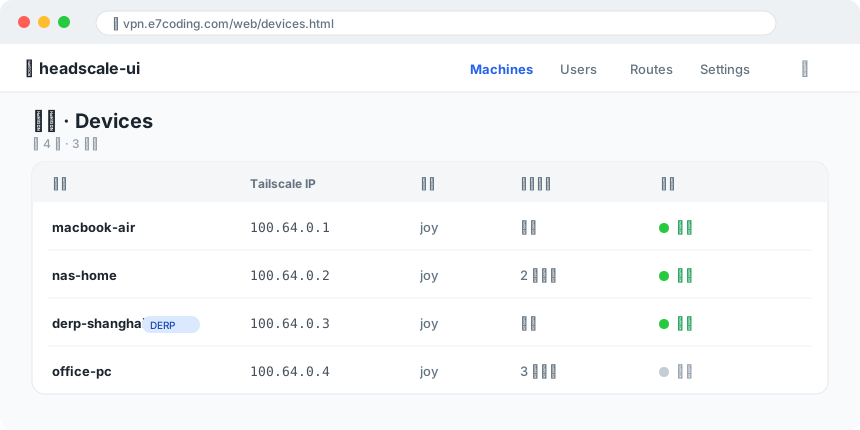
Column meanings:
- Name: device hostname. Devices marked
DERPare relay nodes from the previous post. - Tailscale IP: virtual IP in
100.64.0.0/10, used for tailnet communication. - User: owner user.
- Last seen / status: green means online, gray means offline.
5. Daily Device Management
Click a device’s actions menu. Common operations are there:
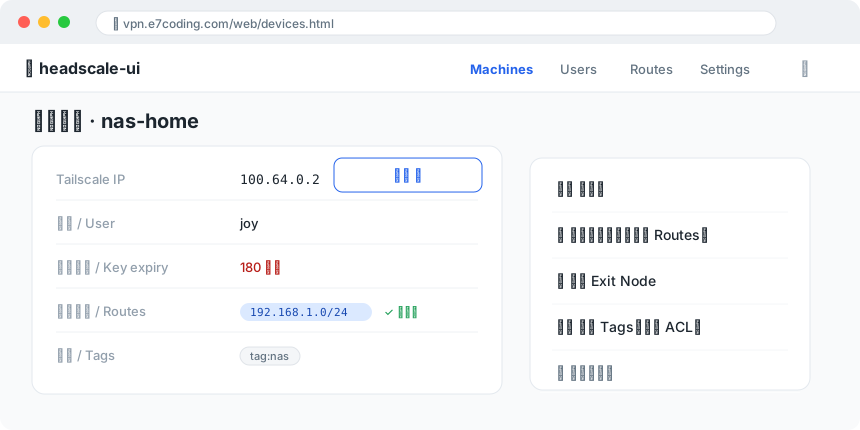
Common actions:
- Rename: use a readable display name instead of a random hostname.
- Approve subnet routes: if a device runs
tailscale up --advertise-routes=192.168.1.0/24, it advertises its local LAN, but you must approve the route here before it works. This is Subnet Router. - Set as Exit Node: route all traffic from other devices through this device, similar to a full exit proxy. It requires
--advertise-exit-nodeand approval. - Manage Tags: add tags such as
tag:nasand use ACLs to control access. - Expire key: force re-authentication, useful when a device is lost.
- Delete device: remove it from the network completely.
Pitfalls
--login-servermust match exactly:httpvshttps, ports, and path must match Headscale’sserver_url.- nodekey expires: if the register link sits too long, rerun
tailscale upto get a new one. - Device mysteriously goes offline? Often key expiry: Headscale node keys expire by default, such as after 180 days. Re-authenticate, disable key expiry for that device, or adjust Headscale config.
- Subnet routes / Exit Node not working:
--advertise-routesonly announces intent. You must approve routes in headscale-ui or withheadscale nodes routes. - Want to use device names? Enable MagicDNS in Headscale, otherwise use
100.64.x.xIPs.
At this point, self-hosted Headscale + web UI + domestic DERP relay + device onboarding are all in place. Starting from What Is Tailscale, the full series gives you a private network that feels like your home LAN wherever you are.